-
Notify Changes Using INotifyPropertyChanged Interface In WPF MVVM
over 7 years ago
While studying MVVM architectural pattern in WPF you might have come across INotifyPropertyChanged interface and wondered the need of using it. Following MVVM architectural pattern in WPF application, we used binding to access data in the view and it's also recommended to avoid writing logic in code behind file which can be taken care of using Commands. Following such pattern it may happen that source property gets updated which also requires to notify the bindings in the view that source property has changed and view must also gets updated with the new values.
To fulfill this requirement we used INotifyPropertyChanged Interface which is defined in System.ComponentModel namespace. It provides an event Handler called PropertyChangedEventHandler which is used to define an Event that can be used to notify the changes occurred in Properties.
You may like to read the following articles to get some idea of MVVM and Commands:
http://findnerd.com/account/list/view/Simple-MVVM-Application-In-WPF/27501/
http://findnerd.com/list/view/Using-commands-in-WPF/27531/
What we are going to see
In the following example we are going to bind user details like name and age in the UI and will update the values to see how INotifyPropertyChanged helps in updating the Views with the updated values.
Lets create a new WPF application and name it as INotifyPropertyChangedDemo. Now add three folders Model, Views and ViewModel.
In the Model folder add a class file UserModel.cs and paste the following code in that file.
using System.ComponentModel;

namespace INotifyPropertyChangedDemo.Model
{
    public class UserModel : INotifyPropertyChanged
    {
        private string _name;
        private int _age;

        public string Name
        {
            get { return _name; }
            set
            {
                _name = value;
                RaisePropertyChanged("Name");
            }
        }

        public int Age
        {
            get { return _age; }
            set
            {
                _age = value;
                RaisePropertyChanged("Age");
            }
        }

        public event PropertyChangedEventHandler PropertyChanged;
        protected void RaisePropertyChanged(string propertyName)
        {
            PropertyChangedEventHandler handler = PropertyChanged;
            if (handler != null)
            {
                handler(this, new PropertyChangedEventArgs(propertyName));
            }
        }
    }
}
Here we have declared two private variables with their corresponding public properties where everytime value is set, we are calling a method RaisePropertyChanged("propertyname") that fires a property changed event.
Now let's add a class file RelayCommand.cs inside ViewModel folder and paste following code inside it. This class provides us flexibility of binding commands directly to the ViewModels which prevent us from writing code in the views code behind. While using RelayCommand we need to provide two methods. The first one defines the method to be executed and second one defines whether the command can be executed.
using System;
using System.Collections.Generic;
using System.Linq;
using System.Text;
using System.Threading.Tasks;
using System.Windows.Input;

namespace INotifyPropertyChangedDemo.ViewModel
{
    public class RelayCommand : ICommand
    {
        public RelayCommand(Action<object> execute) : this(execute, null)
        {
        }
        public RelayCommand(Action<object> execute, Predicate<object> canExecute)
        {
            if (execute == null)
                throw new ArgumentNullException("execute");
            _execute = execute;
            _canExecute = canExecute;
        }
        public bool CanExecute(object parameter)
        {
            return _canExecute == null ? true : _canExecute(parameter);
        }
        public event EventHandler CanExecuteChanged
        {
            add { CommandManager.RequerySuggested += value; }
            remove { CommandManager.RequerySuggested -= value; }
        }
        public void Execute(object parameter)
        {
            _execute(parameter);
        }
        private readonly Action<object> _execute;
        private readonly Predicate<object> _canExecute;
    }
}
Now in the same ViewModel folder add another class file UserViewModel.cs and paste the following code inside it.
using INotifyPropertyChangedDemo.Model;
using System.Windows.Input;

namespace INotifyPropertyChangedDemo.ViewModel
{
    public class UserViewModel
    {
        public UserViewModel()
        {
            User = new UserModel();
            SetDefaultValue();
        }

        private void SetDefaultValue()
        {
            User.Name = "Initial Name";
            User.Age = 23;
        }

        private UserModel _user;
        private ICommand _updateUserCommand;

        public UserModel User
        {
            get
            {
                return _user;
            }
            set
            {
                _user = value;
            }
        }

        #region Commands
        public ICommand UpdateUserCommand
        {
            get
            {
                if (_updateUserCommand == null)
                {
                    _updateUserCommand = new RelayCommand(param => this.UpdateUser(), CanExecuteUpdateUserCommand);
                }
                return _updateUserCommand;
            }
        }

        private bool CanExecuteUpdateUserCommand(object obj)
        {
            return true;
        }

        private void UpdateUser()
        {
            var user = User;
            User.Name = "Updated Name";
            User.Age = 30;
        }
        #endregion Commands
    }
}
Few points regarding the code shown above:
- You may ask why we have a User property defined in this ViewModel. It's because we will be dealing with a single object of type UserModel in our view as we need to update a single user details at a time. Had we need to show the list of users in View, we would also needed a list of UserModel type.
- Instead of binding click events in code behind file to update user details, we would be binding the property UpdateUserCommand to Command property of Update button as shown in following sample.
<Button Content="Update Values" Command="{Binding Path=UpdateUserCommand}" Width="200"/> - To show the initial values for Name and Age in the View, we have used a function SetDefaultValue() which gets called from the constructor. These values will be shown for the first time after we run our completed application.
- To show how change in property values automatically updates the values in View, we will use an "Update" button in the UI which will be binding with the UpdateUserCommand command and thereby will be calling the function UpdateUser() to update the User details with the static values i.e, "Updated Name" for Name and 30 for age.
Let's remove default MainWindow.xaml and add a new folder Views. Now create a new Window (WPF) inside Views folder and give it same name as default page MainWindow.xaml and paste the below code in that xaml file.
<Window x:Class="INotifyPropertyChangedDemo.Views.MainWindow"
        xmlns="http://schemas.microsoft.com/winfx/2006/xaml/presentation"
        xmlns:x="http://schemas.microsoft.com/winfx/2006/xaml"
        xmlns:d="http://schemas.microsoft.com/expression/blend/2008"
        xmlns:mc="http://schemas.openxmlformats.org/markup-compatibility/2006"
        xmlns:local="clr-namespace:INotifyPropertyChangedDemo.Views"
        mc:Ignorable="d"
        xmlns:ViewModel="clr-namespace:INotifyPropertyChangedDemo.ViewModel"
        Title="MainWindow" Height="300" Width="300">

    <Window.DataContext>
        <ViewModel:UserViewModel/>
    </Window.DataContext>

    <Grid>
        <Grid.RowDefinitions>
            <RowDefinition Height="50"/>
            <RowDefinition Height="50"/>
            <RowDefinition/>
        </Grid.RowDefinitions>

        <Grid.ColumnDefinitions>
            <ColumnDefinition/>
            <ColumnDefinition/>
        </Grid.ColumnDefinitions>

        <TextBlock Text="Name" Grid.Row="0" Grid.Column="0" FontWeight="Bold"/>
        <TextBlock Text="{Binding Path=User.Name, Mode=TwoWay}" Grid.Row="0" Grid.Column="1"/>

        <TextBlock Text="Age" Grid.Row="1" Grid.Column="0" FontWeight="Bold"/>
        <TextBlock Text="{Binding Path=User.Age, Mode=TwoWay}" Grid.Row="1" Grid.Column="1"/>

        <Button Content="Update Values" Command="{Binding Path=UpdateUserCommand}" Grid.Row="2" Grid.ColumnSpan="2" Height="50" Margin="10,0,10,0"/>
    </Grid>
</Window>
In the above xaml code, refer to the following line
xmlns:ViewModel="clr-namespace:INotifyPropertyChangedDemo.ViewModel"Here we have added a namespace "ViewModel" which points to the location where we have UserViewModel defined. Having defined this we would be able to specify the DataContext using the following syntax.
<Window.DataContext>
     <ViewModel:UserViewModel/>
</Window.DataContext>
By defining the DataContext as the UserViewModel, we are now able to bind controls with the properties like User.Name and User.Age.
Note: If you try to run your application you will get an exception "Cannot locate resource 'mainwindow.xaml'", it's because in App.xaml file we have StartupUri set to MainWindow.xaml file which has been removed from our application, instead we have just created file with same name inside Views folder. So let's open App.xaml file and changed the syntax from StartupUri="MainWindow.xaml" to StartupUri="Views/MainWindow.xaml".
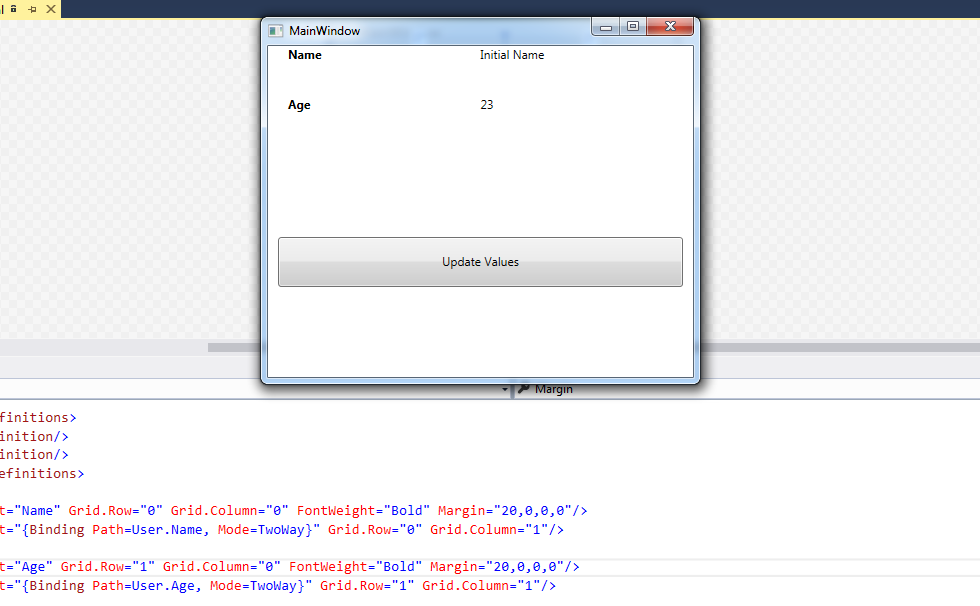
Let's run our application and we will see the Name and age set to initial values with the help of SetDefaultValue() function inside UserViewModel.
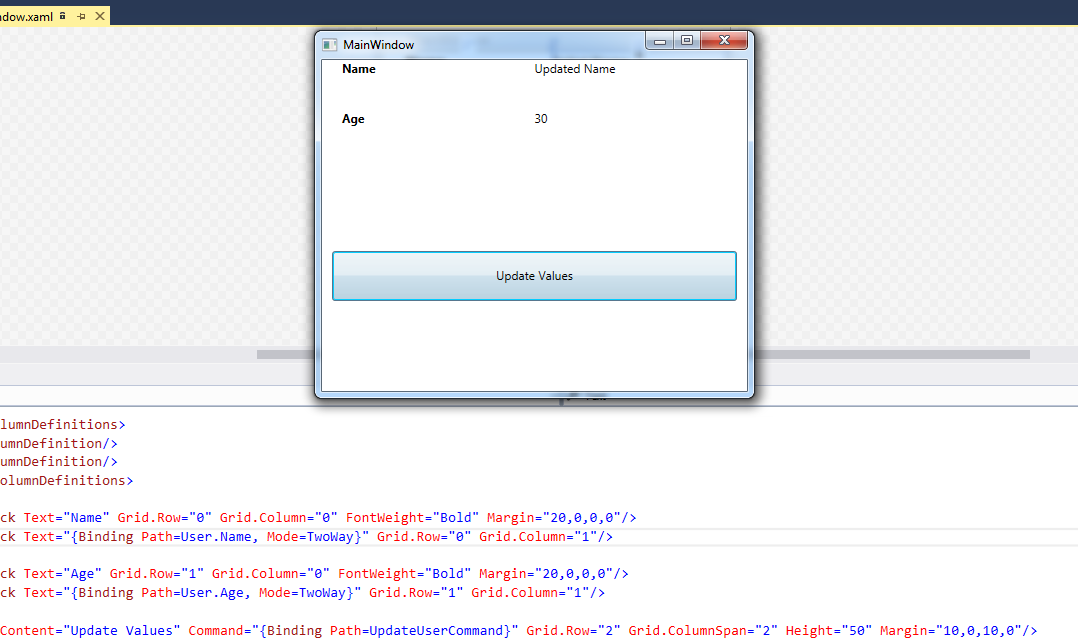
Let's click on "Update Values" button and we will get updated values on screen as follows.
Now you can play around with this code and may want to comment the RaisePropertyChanged() calls inside UserModel.cs to see if you are still able to get updated values in the UI. Give it a try, I hope you enjoyed this article.

- You may ask why we have a User property defined in this ViewModel. It's because we will be dealing with a single object of type UserModel in our view as we need to update a single user details at a time. Had we need to show the list of users in View, we would also needed a list of UserModel type.


0 Comment(s)