-
Customizing validation error messages in ASP.NET MVC
almost 10 years ago
Hi all,
In the following blog, I'll try to show how to customize validation messages in ASP.NET MVC application. In MVC application, while implementing both client side and server side validation, we usually came across default way of showing validation messages in the form as shown in following screenshot.
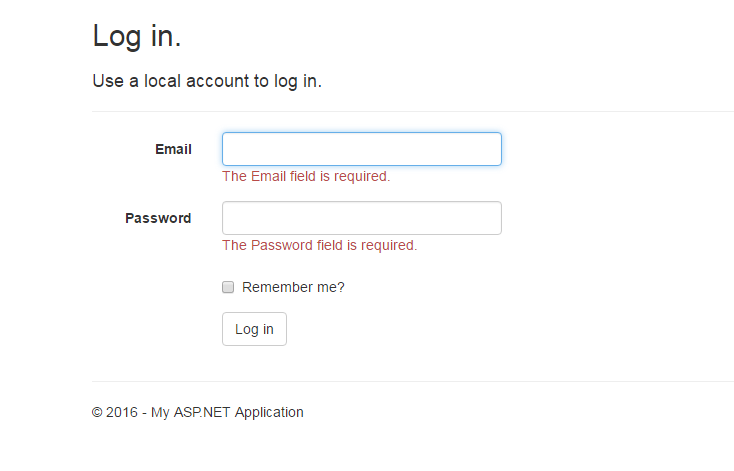
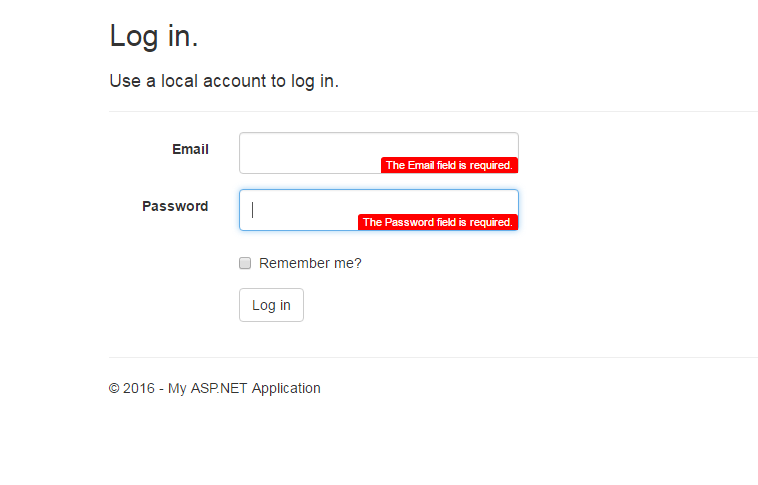
Well it's fine as far as client doesn't have specific UI in his mind to go with these validation messages. Obviously we can't assume all possibilities at once, hence we are just trying to explore a way to get validation messages in a customized way. Let us assume that client wants to show validation messages in following way
For this example, let's proceed with already created Login.cshtml page under Account folder which is further available under View folder. Login page location can be depicted from following screenshot
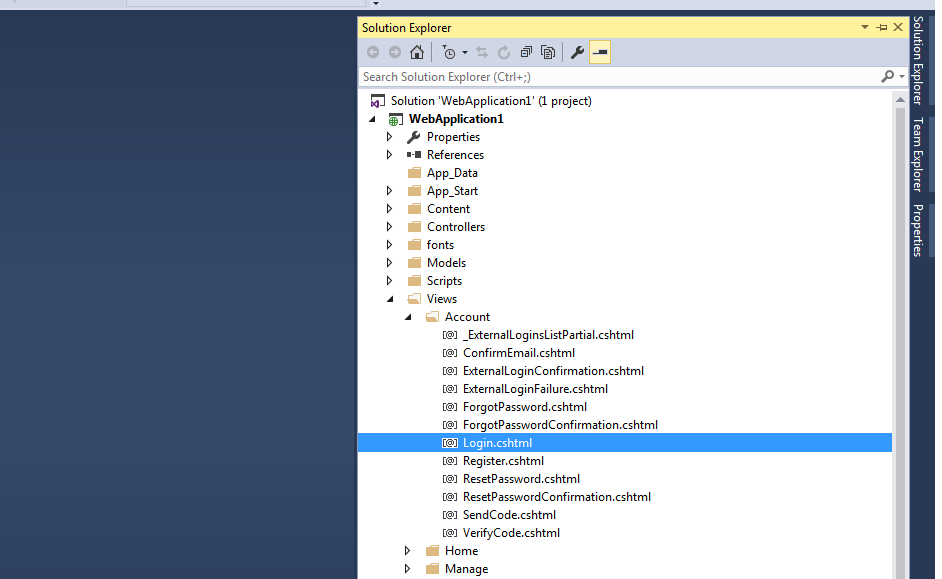
One important point you would like to notice about Login.cshtml page is that it uses default Layout.cshtml page to define its layout other than login screen itself, like menus, footer etc. Default Layout page is placed with location as Views/Shared/_Layout.cshtml.
To achieve the desired output, we'll approach as follows:
1. Instead of finding out what message will show at what time, we'll try to fetch default validation messages and show them in our custom validation container. We will fetch validation message from Html.ValidationMessageFor extension method like
@Html.ValidationMessageFor(m => m.Email, "", new { @class = "text-danger" })As we are showing validation in customized way, so we will hide it from the screen by changing it's markup with
@Html.ValidationMessageFor(m => m.Email, "", new { @style = "display:none" })Our custom validation container could be any HTML element that will be fetching and showing actual validation messages from hidden @Html.ValidationMessageFor extension method. For this example, I have taken div tag for this purpose like
<div class="error-msg hide"></div>Now lets check the difference in Login.cshtml page
Login.cshtml page markup before changes
@using WebApplication1.Models
@model LoginViewModel
@{
    ViewBag.Title = "Log in";
}

<h2>@ViewBag.Title.</h2>
<div class="row">
  <div class="col-md-8">
    <section id="loginForm">
       @using (Html.BeginForm("Login", "Account", new { ReturnUrl = ViewBag.ReturnUrl },
                  FormMethod.Post, new { @class = "form-horizontal", role = "form" }))
       {
            @Html.AntiForgeryToken()
            <h4>Use a local account to log in.</h4>
            <hr />
            @Html.ValidationSummary(true, "", new { @class = "text-danger" })

            <div class="form-group">
                 @Html.LabelFor(m => m.Email, new { @class = "col-md-2 control-label" })
                 <div class="col-md-10">
                    @Html.TextBoxFor(m => m.Email, new { @class = "form-control" })
                    @Html.ValidationMessageFor(m => m.Email, "", new { @class = "text-danger" })
                 </div>
             </div>
          <div class="form-group">
             @Html.LabelFor(m => m.Password, new { @class = "col-md-2 control-label" })
             <div class="col-md-10">
                 @Html.PasswordFor(m => m.Password, new { @class = "form-control" })
                 @Html.ValidationMessageFor(m => m.Password, "", new { @class = "text-danger" })
             </div>
             </div>
          <div class="form-group">
             <div class="col-md-offset-2 col-md-10">
                  <div class="checkbox">
                       @Html.CheckBoxFor(m => m.RememberMe)
                       @Html.LabelFor(m => m.RememberMe)
                  </div>
             </div>
          </div>
          <div class="form-group">
             <div class="col-md-offset-2 col-md-10">
                  <input type="submit" value="Log in" class="btn btn-default" />
             </div>
          </div>
       }
   </section>
    </div>
</div>

@section Scripts {
    @Scripts.Render("~/bundles/jqueryval")
}
Login.cshtml page markup after changes
@using CustomValidationMVC.Models
@model LoginViewModel
@{
    ViewBag.Title = "Log in";
}


<h2>@ViewBag.Title.</h2>
<div class="row">
    <div class="col-md-8">
        <section id="loginForm">
            @using (Html.BeginForm("Login", "Account", new { ReturnUrl = ViewBag.ReturnUrl }, FormMethod.Post, new { @class = "form-horizontal", role = "form" }))
            {
                @Html.AntiForgeryToken()
                <h4>Use a local account to log in.</h4>
                <hr />

                <div class="form-group">
                    @Html.LabelFor(m => m.Email, new { @class = "col-md-2 control-label" })
                    <div class="col-md-10">
                        @Html.TextBoxFor(m => m.Email, new { @class = "form-control" })
                        @Html.ValidationMessageFor(m => m.Email, "", new { @style = "display:none" })
                        <div class="error-msg hide"></div>
                    </div>
                </div>
                <div class="form-group">
                    @Html.LabelFor(m => m.Password, new { @class = "col-md-2 control-label" })
                    <div class="col-md-10">
                        @Html.PasswordFor(m => m.Password, new { @class = "form-control" })
                        @Html.ValidationMessageFor(m => m.Password, "", new { @style = "display:none" })
                        <div class="error-msg hide"></div>
                    </div>
                </div>
                <div class="form-group">
                    <div class="col-md-offset-2 col-md-10">
                        <div class="checkbox">
                            @Html.CheckBoxFor(m => m.RememberMe)
                            @Html.LabelFor(m => m.RememberMe)
                        </div>
                    </div>
                </div>
                <div class="form-group">
                    <div class="col-md-offset-2 col-md-10">
                        <input type="submit" value="Log in" class="btn btn-default" />
                    </div>
                </div>
            }
        </section>
    </div>
</div>

@section Scripts {
    @Scripts.Render("~/bundles/jqueryval")
}
2. Having changed the markup now we would need some css to show customized messages in proper way. For this example just add following following css style either in the beginning or at the end of the Login.cshtml page.
<style>
    .form-control {
        display: block;
        width: 100%;
        height: 42px;
        padding: 6px 12px;
        font-size: 14px;
        line-height: 1.42857143;
        color: #555;
    }

    .error-msg {
        background: red;
        border-radius: 3px 3px 0 0;
        color: white;
        float: right;
        font-size: 11px;
        line-height: 16px;
        margin-right: 55%;
        margin-top: -17px;
        padding: 0 5px;
        text-align: center;
        width: auto;
    }

    .hide {
        display: none;
    }
</style>
Obviously you can better manage your styles in separate stylesheet file(.css) and add reference of that file in Login.cshtml or Layout.cshtml file like
// Assuming you have placed given styles in Login.css file under Content folder
<link href='@Url.Content("~/Content/Login.css")' rel="stylesheet" />
3. At this point of stage, if you will click on the "Log in" button, you won't get any validation message on your screen. That's because we have hidden provided Html.ValidationMessageFor extension method by setting their style property as
style = "display:none"Ok so what's next? Don't worry remember about the custom validation containers, we have added just after every Html.ValidationMessageFor statements in our updated Login.cshtml page markup, so now we will try to make them live with some JavaScript code.
Let's create a JavaScript file under Scripts folder, and named it as "CustomValidation.js". Now add following JavaScript code in it and save it.
// Function 1
$('input').on('blur keyup', function () {
    if ($(this).hasClass("input-validation-error")) {
        $(this).parent().find("div.error-msg").html($(this).parent().find("span").find("span").html());
        $(this).parent().find("div.error-msg").removeClass("hide");
    } else {
        $(this).parent().find("div.error-msg").addClass("hide");
    }
});


// Function 2
$("form").submit(function () {

    if (!$(this).valid()) {
        ValidateFields();
    }
    else {
        return true;
    }
});

// Function 3
function ValidateFields() {
    $('input').each(function () {

        if ($(this).hasClass("input-validation-error")) {
            $(this).parent().find("div.error-msg").html($(this).parent().find("span").find("span").html());
            $(this).parent().find("div.error-msg").removeClass("hide");

        } else {
            $(this).parent().find("div.error-msg").addClass("hide");
        }
    });
}
Now just include it at the bottom of the Login.cshtml page as follows:
<script src='@Url.Content("~/Scripts/CustomValidation.js")'></script>Before we discuss usage of these functions one by one, please note that every time validation failed for an input field, an extra css class "input-validation-error" gets added to it. So we'll actually keep track, whether this class gets assigned to an input field or not. In case if it is assigned to an input field, we'll fetch the validation message from hidden Html.ValidationMessageFor extension method and set it as a content to our custom validation container (<div class="error-msg hide"></div>) in our case).
Description of functions used in "CustomValidation.js" file
Function 1
$('input').on('blur keyup', function () {
	.....
	.....
});
This function will watch for two events "blur" and "keyup". So everytime user release a key or lost focus from input field, we will check whether it initiates validation by using if it has assigned "input-validation-error" class or not. If yes then show corresponding div tag with appropriate validation message else hide it.
Function 2
$("form").submit(function () {
	....
	....
});
This function will get called when user clicks on "Log in" button. We are using
$(this).valid()to check if there are any validations raised in the form or not. If any validation violated in the form, then we are iterating through each input element and checking if it has assigned "input-validation-error" class or not. If yes then show corresponding div tag with appropriate validation message else hide it.
Function 3
function ValidateFields() {
	....
	....
});
This function is used by Function 2 to iterate through input elements.
Now if you try to run Login page with above changes, you will certainly get the following JavaScript error which you can check in you browser console also (by pressing F12). The following JavaScript error will obviously prevent us from getting desired output.
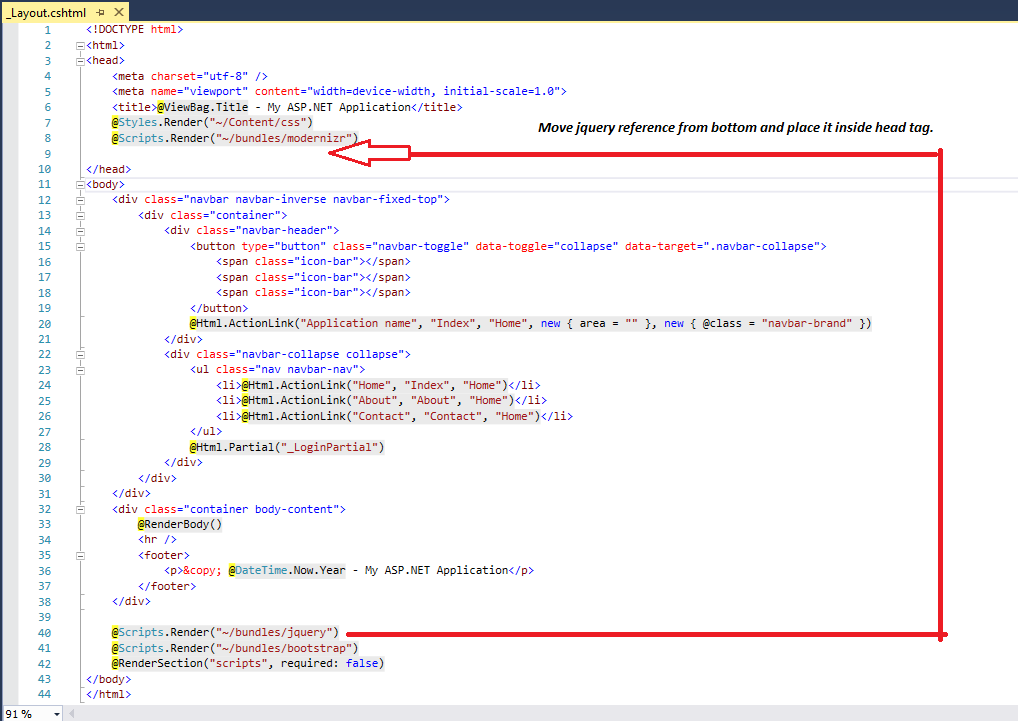
CustomValidation.js:1 Uncaught ReferenceError: $ is not definedThis error is because of the fact that in Layout.cshtml page, jQuery reference is added at the bottom of the page. As our Login.cshtml content is rendered before including jQuery reference, it results in above error due to the fact that in our CustomValidation.js file we are using methods defined in jQuery library before actually including it. (jQuery methods we used like parent() for instance).
To get this error resolved, as obvious we would need to add jQuery reference before Login.cshtml page gets rendered on browser, so for that we can simply move jQuery reference from the end of the page and place it in the head tag.
Please find the following screenshot, showing what exactly I mean by moving jQuery reference.
Now just run your Login page and see those boring validation messages in a more attractive way. The approach to implement related changes in the above example is kept as simple as possible, but while working in real ASP.NET MVC application you would like to include your stylesheet file(s) or JavaScript file(s) in bundle hence improving request load time.
Hope you have enjoyed this blog.


0 Comment(s)