The client side form validation is offered the AngularJS. The state of the form and input fields are monitored by AngularJS which helps us to notify the user about the current state along with, it also keeps the information if they have been changed/ modified, or not. So, in this tutorial, we will learn form validation using Angular Validator in Ionic framework.

Angular validator class contains some built-in method for validation.
Validator.required: The required validator ensure that value is entered the input field.
Validator.minLength(number): The minLength(num) validator controlar require that value is greater than a number.
Validator.maxLength(number): The maxLength(num) validator controlar require that value is less than a number.
Validator.email: The email Validator that performs email validation.
Validator.pattern(‘RegExp’): The pattern(‘RegExp’) validator controller match the regular expression to its value.
Implementation:
To use the angular validator build-in method for validation, we required two more controllers to implement form validation and those are FormControl and FormGroup but however, this is not sufficient to validate all input field that can be needed to implement our own custom validators.
FormControl:
A formControl is tied to the particular input field with the value is entered by the user. You can define the multiple validators for single formControl.
Tied the input value in the Template using the MyControl directive home.html file.
<ion-input type="text" formControlName="UserName"></ion-input>
Multiple Validator uses by single control home.ts file. Make sure have to use the same form control name here which is used in the home.html file.
UserName : new FormControl('',[Validators.required, Validators.email]),
FormGroup:
A formGroup is a collection of formControl. All the formControl element are Grouped using the formGroup.
Import the FormControl, FormGroup, Validators class to the home.ts file.
import { FormGroup, Validators, FormControl } from '@angular/forms';
Import the OnInit class, which is used to call the form validation asynchronously. Create from group variable inside HomePage class
group: FormGroup;
Function of validation input field:
ngOnInit(){
   this.group = new FormGroup({
     UserName : new FormControl('',[Validators.required, Validators.email]),
     Password : new FormControl('',[Validators.required, Validators.minLength(6)])
   })
 }
Home.ts file source code:
import { Component } from '@angular/core';
import { NavController } from 'ionic-angular';
import { RegisterPage } from '../register/register';
import {  OnInit } from '@angular/core';
import { FormGroup, Validators, FormControl } from '@angular/forms';
@Component({
 selector: 'page-home',
 templateUrl: 'home.html'
})
export class HomePage {

 constructor(public navCtrl: NavController) {
 group: FormGroup;

 ngOnInit(){
   this.group = new FormGroup({
     UserName : new FormControl('',[Validators.required, Validators.email]),
     Password : new FormControl('',[Validators.required, Validators.minLength(6)])
   })
 }

}
Now we need to create the form in the home.html file and initialize the formGroup name to be the group which we have declared the formGroup variable in the home.ts file.
<form [formGroup]="group">
  ...
</form>
Need to create input field and have to use the same form control name here which is used in the home.ts file.
<ion-item>
    <ion-label floating>UserName</ion-label>
    <ion-input type="text" formControlName="UserName"></ion-input>
</ion-item>
Display the Error messages:
If need to check input field is validated or not, you have to use same form control name here which you have used in home.ts file.
formGroupVariable.get(formControlName).hasError(FormControlValidationName)
group.get(‘’).touched will be triggered whenever the user clicks the input field.
formGroupVariable.get(formControlName).touched
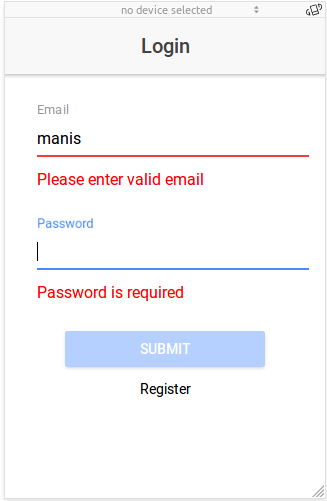
<div class="error" *ngIf="group.get('UserName').hasError('required') && group.get('UserName').touched">
     Email is required
</div>
<div class="error" *ngIf="group.get('UserName').hasError('email') && group.get('UserName').touched">
      Please enter valid email
</div>
We can customize the error text color in the home.scss file.
.error{color:red;}
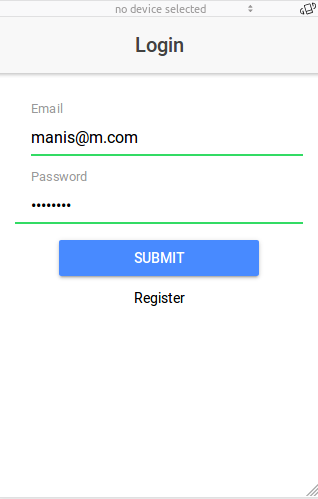
We can disable the submit button while the input field is invalid.
<button ion-button class="submit-button" [disabled]="group.invalid">Submit</button>
Home.html file source code:
<ion-header>
  <ion-navbar>
    <ion-title class="header">
      Login
    </ion-title>
  </ion-navbar>
</ion-header>

<ion-content padding>
  <form novalidate [formGroup]="group" (ngSubmit)="onSubmit(group)">
    <ion-list >
      <ion-item>
        <ion-label floating>Email</ion-label>
        <ion-input type="text" formControlName="UserName"></ion-input>
      </ion-item>

      <ion-item no-lines *ngIf="(group.get('UserName').hasError('required') || group.get('UserName').hasError('email') ) && group.get('UserName').touched">
          <div class="error" *ngIf="group.get('UserName').hasError('required') && group.get('UserName').touched">
            Email is required
          </div>
          <div class="error" *ngIf="group.get('UserName').hasError('email') && group.get('UserName').touched">
            Please enter valid email
          </div>
      </ion-item>
      <ion-item>
        <ion-label floating>Password</ion-label>
        <ion-input type="password" formControlName="Password"></ion-input>
      </ion-item>
      <ion-item no-lines *ngIf="(group.get('Password').hasError('required') || group.get('Password').hasError('minlength') ) && group.get('Password').touched">
        <div class="error" *ngIf="group.get('Password').hasError('required') && group.get('Password').touched">
          Password is required
        </div>
        <div class="error" *ngIf="group.get('Password').hasError('minlength') && group.get('Password').touched">
          Password must be at least 6 characters long.
        </div>
      </ion-item>

    </ion-list>
    <button ion-button class="submit-button" [disabled]="group.invalid">Submit</button>
  </form>

  <p class="register" (click) ="goToRegisterPage()">Register</p>
</ion-content>
Output:


0 Comment(s)