In this blog, we will learn about form validation in AngularJS. From Angular 1.3 onwards, ngMessages module has been introduced and we will be using the same for form validation. Before the addition of this module, developers had to make use directives such as ng-class /ng-show to show error messages resulting in cluttered code.
Let’s start with an example to illustrate the use of ngMessages module. We will be using a simple form with following fields:
1) Name
2) Email
3) Comment
Following is the code snippet for the same:
<!DOCTYPE html>
<html lang="en">
  <head>
    <meta charset="utf-8" />
    <title>ngMessages demo</title>
  </head>
  <body ng-app="app">
    <script src="//cdnjs.cloudflare.com/ajax/libs/angular.js/1.2.20/angular.min.js"></script>
    <script src="//cdnjs.cloudflare.com/ajax/libs/angular-messages/1.5.6/angular-messages.min.js"></script>
    <script>
      var app = angular.module('app', ['ngMessages']);
    </script>

  <form name="errorMessageForm" class="messageForm" >
    <label>Name:</label>
    <input type="text" name="userName" ng-model="name"  />

    <label>Email:</label>
    <input type="email" name="userEmail" ng-model="email"  />

    <label>Comment:</label>
    <textarea type="text" name="userComment" ng-model="comment"></textarea>
  </form>
  </body>
</html>
1) In the above piece of code we are first importing reference for AngularJS.
2) Since ngMessages module is not contained in the core Angular module hence we are importing it separately.
Also, note an important part of code [app = angular.module('app', ['ngMessages'])] that makes our app aware that it will be using the ngMessages module. Now we are set for using the ngMessages directive on the page, let's add it.
To add ngMessages, we wrap the block of messages that need to displayed within an element having attribute of ng-messages=””. In the attribute of the parent element, we place the field’s error by using the below syntax:
ng-messages=<form_Name>.<field_Name>.$error
Finally , we will add a child element for each case(mandatory check , length check etc.) that needs to be implemented. Also, based on the directives we have added to the input field, we need to pass value to the ng-message attribute.
Using the above syntax we will now update the form section to add validation checks. Following is the updated piece of code we have after making all the necessary changes for following validation checks.
1) Add a required check for field "Name"
2) Add a required and valid format check for field "Email"
3) Add a required and minimum/maximum length check for field "Comment"
    <form name="errorMessageForm">

            <label>Name:</label>
            <input type="text" name="userName" ng-model="name" required />
            <div ng-messages="errorMessageForm.userName.$error">
                <div ng-message="required">This field is required</div>
            </div>

            <label>Email:</label>
            <input type="email" name="userEmail" ng-model="email" required />
            <div ng-messages="errorMessageForm.userEmail.$error">
                <div ng-message="required">This field is required</div>
                <div ng-message="email">Your email address is invalid</div>
            </div>

            <label>Comment:</label>
            <textarea type="text" name="userComment"   ng-model="comment" ng-minlength="100" ng-maxlength="1000" required></textarea>
            <div ng-messages="errorMessageForm.userComment.$error">
                <div ng-message="required">This field is required</div>
                <div ng-message="minlength">Message must be over 100 characters</div>
                <div ng-message="maxlength">Message must not exceed 1000 characters</div>
            </div>

   </form>
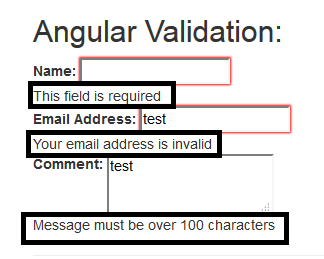
On running the updated piece of code we can see the validation checks working properly in browser as below:

Conclusion:
We can now see how easy it is to do form validation using ngMessages module. We just need to decorate the field elements with the correct attributes and validation will be taken care of by AngularJS and the user will come to know whether a field is valid or invalid. To further refine the implementation we should add css classes to highlight the validation issues on page.
0 Comment(s)