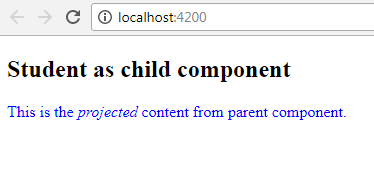
Projecting content(insertion of HTML elements or other components) in a component is Content Projection. In Angular, it can be achieved via <ng-content></ng-content> directive. Shadow DOM can be inserted in a component via Content Projection. It allows to create reusable components and can make application scalable if used properly.

Why Content Projection?
To understand concept of Content Projection, consider an example:-
There are two Angular Components Parent Component named (AppComponent) and Child component named (StudentComponent)
AppComponent
import { Component } from '@angular/core';
@Component({
    selector: 'app-root',
    templateUrl: 'app/app.component.html'
})
export class AppComponent {

	stdMsg: string = "Hello Student !"
}
app.component.html
<app-student [studentMsg]="stdMsg"></app-student>
StudentComponent
import { Component,OnInit } from '@angular/core';
@Component({
    selector: 'app-student',
    template: `{{studentMsg}}`
})
export class StudentComponent implements OnInit {

	@Input() studentMsg: string;

	constructor() { }

	 ngOnInit() {
  }
}
For passing a message from parent component to child component @Input decorator containing the text is used. Therefore, @Input decorator allows one-way communication from parent to child. But what if one wants to provide various type of data such as styled HTML, HTML elements, Inner HTML etc then @Input decorator can become messy to use, in such situation content projection comes into the picture. By default components, support content projection and ngContent directive can be used for placing projected content in the template.
Single Slot Content Projection
For using content projection parent and child component can be as follows :-
AppComponent
import { Component } from '@angular/core';
@Component({
    selector: 'app-root',
    templateUrl: './app.component.html'
})
export class AppComponent {

}
StudentComponent
import { Component,OnInit } from '@angular/core';
@Component({
    selector: 'app-student',
    template: `<div><h2>Student as child component</h2><ng-content></ng-content></div>`
})
export class StudentComponent implements OnInit {

	constructor() { }

	 ngOnInit() {
  }
}
Now when StudentComponent is used by AppComponent, content can be projected as follows :-
app.component.html
<app-student>
   <p style="color:blue">This is the <i>projected</i> content from parent component.</p>
</app-student>
Output :-

In above code anything that is placed inside <app-student> selector will be placed inside of <ng-content></ng-content> in child component. The child component does not know what is being projected. Therefore, there can be another component, markup etc projected here.
Multiple Slot Content Projection
There can be multiple <ng-content></ng-content> directive in a component. To specify the position of the projected content to certain ng-content, ng-content selectors are used. There are four types of selectors for projection :-
- Tag Selector Projection.
- Class Selector Projection
- Id Selector Projection
- Attribute Selector Projection
Example of Multiple Slot Content Projection - Tag Selector Projection
Note: AppComponent remains same
StudentComponent
import { Component,OnInit  } from '@angular/core';
@Component({
    selector: 'app-student',
    template: `app/student/student.component.html`
})
export class StudentComponent implements OnInit {

	constructor() { }

	 ngOnInit() {
  }
}
student.component.html
<div class="container">
  <h4>Child Component with tag selector</h4>
  <ng-content select="header"></ng-content>
  <ng-content select="h1"></ng-content>
  <ng-content select="footer"></ng-content>
</div>
app.component.html
<app-student>
  <header><p style="color:blue">This is the <i>projected</i> content from parent component for header tag.</p></header>
  <h1 style="color:crimson">This is the <i>projected</i> content from parent component for h1 tag.</h1>
  <footer><p style="color:brown">This is the <i>projected</i> content from parent component for footer tag.</p></footer>
</app-student>
Output :-

The problem with tag selectors arises when all of e.g h1 elements will get projected to the StudentComponent at the same place. There are many scenarios when this is not desirable in such cases Class, Id and attribute selector can be used.
Example :-
AppComponent and StudentComponent remains same
student.component.html
<div class="container">
  <h4>Child Component with Class and Attribute Selector</h4>
  <ng-content select=".classselect"></ng-content> <!--  Class Selector Projection -->
  <ng-content select="[btnselect]"></ng-content> <!-- Attribute Selector Projection -->
</div>
app.component.html
<app-student>
  <h1 class="classselect">This is the <i>projected</i> content from parent component for class selector.</h1> <!--   Content for class selector -->
  <button btnselect class="btn btn-info">Click Here</button>  <!--   Content for attribute selector -->
  <button>Not displayed</button> <!--   Contains no selector therefore not displayed -->
</app-student>
Output :-

0 Comment(s)