Hello Readers,
This blog shows the basic custom plugin creation in Joomla.
The below are the basic files which is used to create plugin in joomla.
1. myplugin.php
2. myplugin.xml
3. index.html
Step 1 : myplugin.php - myplugin.php is the entry file for plugin. It executed the code when certain event occurs.
Example code of myplugin.php :
class plgContentmyplugin extends JPlugin
{
    public function onContentAfterTitle($context, &$article, &$params, $limitstart)
        {
                return "<p>Hello World!</p>";
        }
}
In the above code, the name of the class should be plg<PluginType><PluginName> i.e plgContentmypluginPlugin(name of the class). After that, I have used the method onContentAfterTitle (which is called after content).
Step 2 : myplugin.xml - myplugin xml file contain's the information about the plugin.
Example code of myplugin.xml :
<?xml version="1.0" encoding="utf-8"?>
<extension version="2.5" type="plugin" group="content">
        <name>plg_content_myplugin</name>
        <author>Brad Markle</author>
        <creationDate>June 18th, 2012</creationDate>
        <copyright>InMotion Hosting</copyright>
        <license>GNU General Public License</license>
        <authorEmail>bradm@inmotionhosting.com</authorEmail>
        <authorUrl>http://www.inmotionhosting.com</authorUrl>
        <version>1.0</version>
        <description>Simple my plugin Plugin that prints "Hello World" at the beginning of every article.</description>
        <files>
                <filename plugin="myplugin">myplugin.php</filename>
                <filename>index.html</filename>
        </files>
</extension>
The above code, describe the name,creationDate,version,author,files etc of the plugin.
Step 3 : index.html - This is the index file of the plugin. You need to place any code in this file or display an empty page.
Example code of index.html :
<html><body bgcolor="#FFFFFF"></body></html>
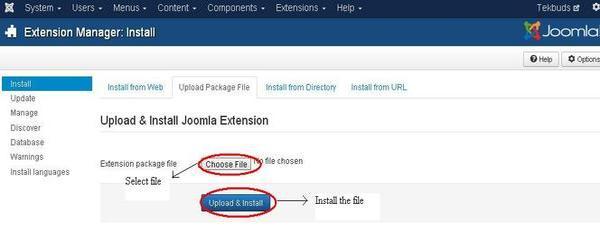
Step 4 : After that zip the files of the folder mypluginPlugin and install the file from the Joomla admin section.
See the screenshot below:

Step 5 : After installing click on the plugin (Extension->Plugins) and enabled. You will see your plugin content on your Joomla frontend page.
0 Comment(s)