Hello Readers
In this blog, I will guide you how to use nth-child pseudo-class(selector) in css file. Generally we have seen nth-child selector in excel sheets and tables. It is very useful for creating formatted excel-sheet in html table and we use it for generating grid layouts without resorting the table. Nth-child selector will allow to select one or more elements according to formula.
Nth-child Basic Rules :
Below is how we can use the basic syntax of Nth-child pseudo-class:-
:nth-child(an+b), a is the frequency and b is the offset. nth-child(n) selector matches every element that is the nth child, of its parent.
- N : used for even or odd child (means for all child)
- 2n, 2n+0 or eve : n Used for all even child, i.e 2, 4, 6, 8, 10…
- 2n+1 or odd : Used for all odd child, i.e 1, 3, 5, 7, 9…
- 2n+2 : Used for all 2*n + 2 child, i.e 2, 4, 6, 8, 10…
- 2n+3 : Used for all 2*n + 3 child, i.e 3, 5, 7, 9, 11, 13…
- 3n, 3n+0 or 3n+3 : Used for all child which are multiple of 3, i.e 3, 6, 9, 12, 15…
:nth-child(n)
How to use of syntax :
:nth-child( <an-plus-b> [ of <selector># ]? ) { style properties }
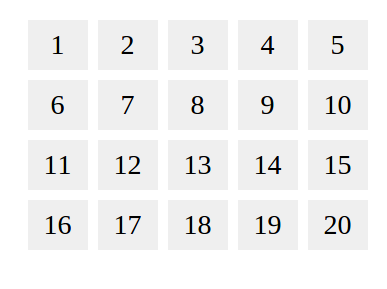
In below code, firstly, we have created a div (the div contains some numbers) and then used “float:left” and after that we have used :nth-child(5n+1) selector to start a new row after every 5 boxes.
#stage div {
    float: left;
    margin: 5px;
    width: 60px;
    height: 50px;
    background: #efefef;
}
#stage div:nth-child(5n+1) {
    clear: left;
}
Use on hover effect:
To use the nth-child selector on hover we will use nth-child pseudo class combination with the ~ general sibling selector. For example ~child-class:nth-child(an).
For example I had assign the hove on follow given below code.
Parent-class:hover ~ (general sibling selector) child-class:nth-child(an)
Css:
#stage div:hover {
    background: red none repeat scroll 0 0;
    cursor: pointer;
    color: #fff;
    font-weight: 600;
}

#div1:hover ~ div:nth-child(1n) {background: #ff0;}
#div2:hover ~ div:nth-child(2n) { background: yellow;}
#div3:hover ~ div:nth-child(3n) { background: yellow;}
#div4:hover ~ div:nth-child(4n) { background: yellow;}
#div5:hover ~ div:nth-child(5n) { background: yellow;}
#div6:hover ~ div:nth-child(6n) { background: yellow;}
#div7:hover ~ div:nth-child(7n) { background: yellow;}
#div8:hover ~ div:nth-child(8n) { background: yellow;}
#div9:hover ~ div:nth-child(9n) { background: yellow;}
#div10:hover ~ div:nth-child(10n) { background: yellow;}
#div11:hover ~ div:nth-child(11n) { background: yellow;}
#div12:hover ~ div:nth-child(12n) { background: yellow;}
#div13:hover ~ div:nth-child(13n) { background: yellow;}
#div14:hover ~ div:nth-child(14n) { background: yellow;}
#div15:hover ~ div:nth-child(15n) { background: yellow;}
#div16:hover ~ div:nth-child(16n) { background: yellow;}
#div17:hover ~ div:nth-child(17n) { background: yellow;}
#div18:hover ~ div:nth-child(18n) { background: yellow;}
#div19:hover ~ div:nth-child(19n) { background: yellow;}
#div20:hover ~ div:nth-child(20n) { background: yellow;}
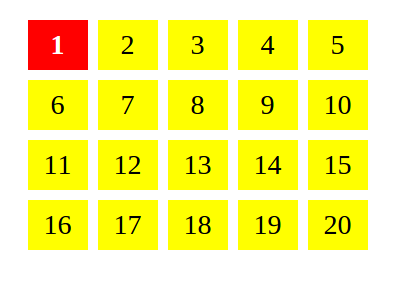
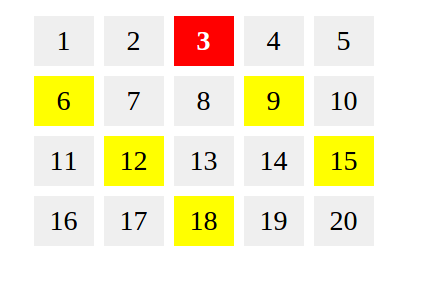
It means every nth sibling will turn yellow when the cursor is over DIV n. When mouseover is on the first div (#div1) than first div will turn red and then every div which is multiple of 1 will turn yellow. When mouseover is on the 3 div (#div3) than third div will turn red and every multiple of 3 will turn yellow.
See the live demo at here: https://jsfiddle.net/szenx9fk/show/
Html:
The code given below we have used id of each div(#div1, #div2,...)
<div id="stage">
	<div id="div1">1</div>
	<div id="div2">2</div>
	<div id="div3">3</div>
	<div id="div4">4</div>
	<div id="div5">5</div>
	<div id="div6">6</div>
	<div id="div7">7</div>
	<div id="div8">8</div>
	<div id="div9">9</div>
	<div id="div10">10</div>
	<div id="div11">11</div>
	<div id="div12">12</div>
	<div id="div13">13</div>
	<div id="div14">14</div>
	<div id="div15">15</div>
	<div id="div16">16</div>
	<div id="div17">17</div>
	<div id="div18">18</div>
	<div id="div19">19</div>
	<div id="div20">20</div>
</div>
Table formatting using nth-child :
In below code, I have used nth-child selector to format HTML table to make it look more professional.
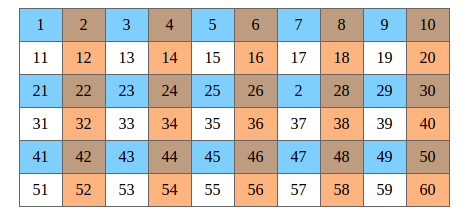
The HTML is very simple, you have to create rows and columns and you can easily change colours. In this example I have changed color with alternate row and column and for effect we have used background color with some alpha-transparency.
CSS:
<style type="text/css">
.tartan {
    border-collapse: collapse;
    margin: 20px auto;
}
.tartan tr:nth-child(2n+1) {
    background: rgba(0, 160, 255, 0.5) none repeat scroll 0 0;
}
.tartan td:nth-child(2n) {
    background: rgba(255, 107, 0, 0.5) none repeat scroll 0 0;
}
.tartan td {
    border: 1px solid #666;
    line-height: 30px;
    text-align: center;
    width: 40px;
}
</style>
HTML:
<table class="tartan">
<tbody>
<tr><td>1</td><td>2</td><td>3</td><td>4</td><td>5</td><td>6</td><td>7</td><td>8</td><td>9</td>   <td>10</td></tr>
<tr><td>11</td><td>12</td><td>13</td><td>14</td><td>15</td><td>16</td><td>17</td><td>18</td><td>19</td><td>20</td></tr>
<tr><td>21</td><td>22</td><td>23</td><td>24</td><td>25</td><td>26</td><td>2</td><td>28</td><td>29</td><td>30</td></tr>
<tr><td>31</td><td>32</td><td>33</td><td>34</td><td>35</td><td>36</td><td>37</td><td>38</td><td>39</td><td>40</td></tr>
<tr><td>41</td><td>42</td><td>43</td><td>44</td><td>45</td><td>46</td><td>47</td><td>48</td><td>49</td><td>50</td></tr>
<tr><td>51</td><td>52</td><td>53</td><td>54</td><td>55</td><td>56</td><td>57</td><td>58</td><td>59</td><td>60</td></tr>
</tbody>
</table>
If you want to remove the intersecting cell it means no need to make transparent backgrounds, you can remove it directly or you can specify another color, for that you can use below code.
.tartan tr:nth-child(odd) td:nth-child(even) {
    background: #fff;
}
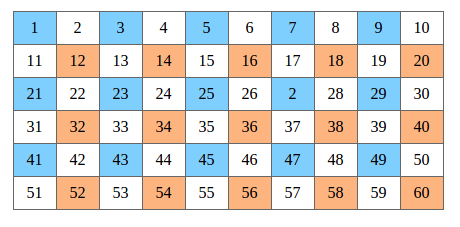
See the live demo at here: https://jsfiddle.net/qjdf7moq/show/
I have attached full code at the bottom.
0 Comment(s)