-
Make a simple paint application in iOS
almost 11 years ago
We all have seen a paint application in our PCs or laptops. So, here we are going to build a simple application which uses different colors to draw on the screen :-
Lets start with making the UI. Drag an UIImageView and UIView in the Main.storyboard and create there IBOutlets. Here we are displaying ten colors to select from list of colors. So drag ten buttons and set different background colors to them. Now give the IBAction of any one button and then connect it to all the UIButtons. Yes! it can be done with a single IBAction but we need to set the tag property of the buttons. Set the tag of the buttons from 0 to 9. [UIButton-> Attributes inspector-> tag]
Now in the ViewController.m file implement the following :-
@interface ViewController (){

    CGPoint lastPoint;
    CGFloat red;
    CGFloat green;
    CGFloat blue;
    CGFloat brush;
    CGFloat opacity;
    BOOL mouseSwiped;
}

- (void)viewDidLoad {
    [super viewDidLoad];

    /* set to some default value */
    red = 0.0/255.0;
    green = 0.0/255.0;
    blue = 0.0/255.0;
    brush = 3.0;
    opacity = 1.0;
    _sideView.hidden = YES ;

    [_tempImage.layer setBorderColor: [[UIColor blackColor] CGColor]];     // _tempImage is the outlet of UIImageView
    [_tempImage.layer setBorderWidth: 2.0];
    _tempImage.layer.cornerRadius = 10.0;
    _tempImage.clipsToBounds = YES;

       [super viewDidLoad];

    // Do any additional setup after loading the view.
}

- (void)touchesBegan:(NSSet *)touches withEvent:(UIEvent *)event {

    mouseSwiped = NO;
    UITouch *touch = [touches anyObject];
    lastPoint = [touch locationInView:self.imageBackView];
}

- (void)touchesMoved:(NSSet *)touches withEvent:(UIEvent *)event {

    mouseSwiped = YES;
    UITouch *touch = [touches anyObject];
    CGPoint currentPoint = [touch locationInView:self.imageBackView];   // self.imageBackView  is the outlet of UIView

    UIGraphicsBeginImageContext(self.imageBackView.frame.size);
    [self.tempImage.image drawInRect:CGRectMake(0, 0, self.imageBackView.frame.size.width, self.imageBackView.frame.size.height)];
    CGContextMoveToPoint(UIGraphicsGetCurrentContext(), lastPoint.x, lastPoint.y);
    CGContextAddLineToPoint(UIGraphicsGetCurrentContext(), currentPoint.x, currentPoint.y);
    CGContextSetLineCap(UIGraphicsGetCurrentContext(), kCGLineCapRound);
    CGContextSetLineWidth(UIGraphicsGetCurrentContext(), brush );
    CGContextSetRGBStrokeColor(UIGraphicsGetCurrentContext(), red, green, blue, 1.0);
    CGContextSetBlendMode(UIGraphicsGetCurrentContext(),kCGBlendModeNormal);

    CGContextStrokePath(UIGraphicsGetCurrentContext());
    self.tempImage.image = UIGraphicsGetImageFromCurrentImageContext();
    [self.tempImage setAlpha:opacity];
    UIGraphicsEndImageContext();

    lastPoint = currentPoint;
}

- (void)touchesEnded:(NSSet *)touches withEvent:(UIEvent *)event {

    if(!mouseSwiped) {
        UIGraphicsBeginImageContext(self.imageBackView.frame.size);
        [self.tempImage.image drawInRect:CGRectMake(0, 0, self.imageBackView.frame.size.width, self.imageBackView.frame.size.height)];
        CGContextSetLineCap(UIGraphicsGetCurrentContext(), kCGLineCapRound);
        CGContextSetLineWidth(UIGraphicsGetCurrentContext(), brush);
        CGContextSetRGBStrokeColor(UIGraphicsGetCurrentContext(), red, green, blue, opacity);
        CGContextMoveToPoint(UIGraphicsGetCurrentContext(), lastPoint.x, lastPoint.y);
        CGContextAddLineToPoint(UIGraphicsGetCurrentContext(), lastPoint.x, lastPoint.y);
        CGContextStrokePath(UIGraphicsGetCurrentContext());
        CGContextFlush(UIGraphicsGetCurrentContext());
        self.tempImage.image = UIGraphicsGetImageFromCurrentImageContext();
        UIGraphicsEndImageContext();
    }

}
The above three methods defines the complete drawing on the screen like from when the touch starts, moves and ends.
Initially we have set the RGB color to black so if you build the project at this point you can draw on the screen with black color. Now you need to implement different color brushes. So, for that include these lines of code in the IBACtion of the UIButton as :-- (IBAction)btnColorButtonPressed:(id)sender { UIButton *colorButtonPressed = (UIButton*)sender; switch(colorButtonPressed.tag) { case 0: red = 0.0/255.0; green = 0.0/255.0; blue = 0.0/255.0; break; case 1: red = 105.0/255.0; green = 105.0/255.0; blue = 105.0/255.0; break; case 2: red = 255.0/255.0; green = 0.0/255.0; blue = 0.0/255.0; break; case 3: red = 0.0/255.0; green = 0.0/255.0; blue = 255.0/255.0; break; case 4: red = 33.0/255.0; green = 143.0/255.0; blue = 73.0/255.0; break; case 5: red = 102.0/255.0; green = 255.0/255.0; blue = 0.0/255.0; break; case 6: red = 51.0/255.0; green = 204.0/255.0; blue = 255.0/255.0; break; case 7: red = 160.0/255.0; green = 82.0/255.0; blue = 45.0/255.0; break; case 8: red = 255.0/255.0; green = 102.0/255.0; blue = 0.0/255.0; break; case 9: red = 255.0/255.0; green = 255.0/255.0; blue = 0.0/255.0; break; } }Here we have set different colors according to the tag given to the button in Main.Storyboard..
Of course none is perfect so you need a eraser if something goes wrong. So add a button and given its IBAction and include the following lines of code :-- (IBAction)btnEraser:(id)sender{ red = 255.0/255.0; green = 255.0/255.0; blue = 255.0/255.0; opacity = 1.0; }Build the project and paint as you want :-)
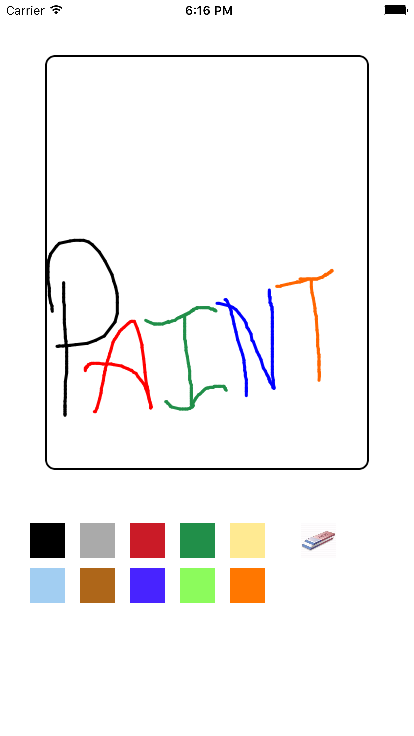
The output will be as :-


0 Comment(s)