-
Spring 3 MVC configuration.
over 12 years ago
Introduction to Spring 3 MVC Framework
The Spring web MVC framework provides model-view-controller architecture and ready components that can be used to develop flexible and loosely coupled web applications. The MVC pattern allow us in separating the different aspects of the application like, view logic, model/business logic and controller logic while providing a loose coupling between these elements.
Model
The Model consist of service and DAO layer of application and in general they will provide data to application in the form of POJO(simple java bean class).
View
View is responsible for rendering the model data in the form of HTML output that the client's browser can interpret.
Controller
The Controller is responsible for processing user requests, calling appropriate request handler method and building appropriate model and passes it to the view for rendering.
Request Processing Lifecycle
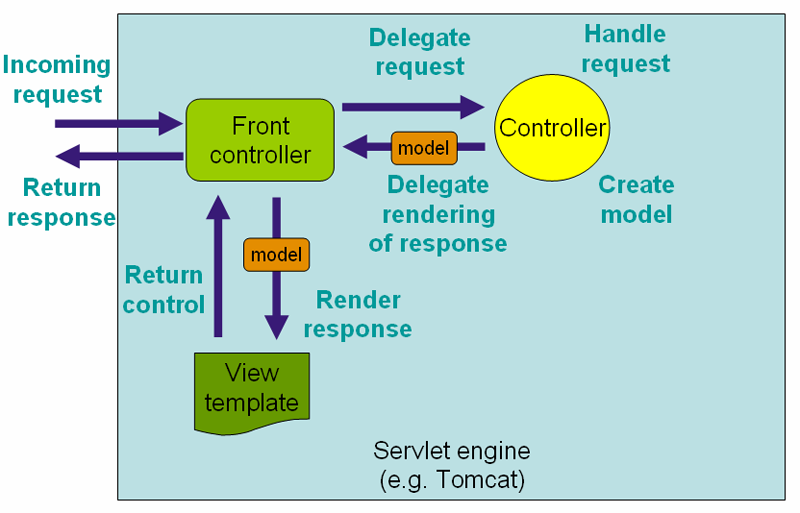
Image source: Springsource
The DispatcherServlet
The Spring Web model-view-controller (MVC) framework is designed around a DispatcherServlet that handles all the HTTP requests and responses. The request processing flow of the Spring Web MVC DispatcherServlet is illustrated in the above diagram.
Following is the sequence of actions happens to an incoming HTTP request to DispatcherServlet:
After receiving an HTTP request, DispatcherServlet consults the DispatcherServlet to call the appropriate Controller.
The Controller takes the request and calls the appropriate service/DAO methods based on used GET or POST method. The service method will set model data based on defined business logic and returns model data to controller and controller transfer this model data along with view name to DispatcherServlet.
The DispatcherServlet will take help from ViewResolver to resolve the view for the request.
Once view is finalized, The DispatcherServlet passes the model data to the view which is finally rendered on the browser in the form of HTML.
Required Configuration
We need to map requests that we want the DispatcherServlet to handle, by using a URL mapping in the web.xml file. The following is an example to show declaration and mapping for SampleWeb DispatcherServlet example:
<web-app ...>

    <display-name>Spring MVC Application</display-name>

   <servlet>
      <servlet-name>SampleWeb</servlet-name>
      <servlet-class>
         org.springframework.web.servlet.DispatcherServlet
      </servlet-class>
      <load-on-startup>1</load-on-startup>
   </servlet>

   <servlet-mapping>
      <servlet-name>SampleWeb</servlet-name>
      <url-pattern>*.jsp</url-pattern>
   </servlet-mapping>

</web-app>
The web.xml file resides in WebContent/WEB-INF directory of your web application. Upon initialization of SampleWeb DispatcherServlet, by default the framework will try to load the application context from a file named [servlet-name]-servlet.xml located in the application's WebContent/WEB-INF directory. In this case our file will be SampleWeb-servlet.xml.
Next,
tag indicates what URLs will be handled by the which DispatcherServlet. Here all the HTTP requests ending with .jsp will be handled by the HelloWeb DispatcherServlet. If We do not want to go with default filename as [servlet-name]-servlet.xml and default location as WebContent/WEB-INF Or we want to load other application context file also upon deployment of web application, we can customize this file name and location by adding the servlet listener ContextLoaderListener in your web.xml file as follows:
<web-app...>
....
....
<context-param>
          <param-name>contextConfigLocation</param-name>
         <param-value>/config/XYZ-servlet.xml</param-value>
         <param-value>/config/applicationContext-1.xml</param-value>
         <param-value>/config/applicationContext-2.xml</param-value>
         ........
         ........
       <param-value>/config/applicationContext-n.xml</param-value>
</context-param>

<listener>
   <listener-class>
      org.springframework.web.context.ContextLoaderListener
   </listener-class>
</listener>
</web-app>
Now, let us examine the required configuration for SampleWeb-servlet.xml file, placed in your web application's WebContent/WEB-INF directory:
<beans xmlns="http://www.springframework.org/schema/beans"
    xmlns:xsi="http://www.w3.org/2001/XMLSchema-instance" xmlns:p="http://www.springframework.org/schema/p"
    xmlns:context="http://www.springframework.org/schema/context"
    xmlns:mvc="http://www.springframework.org/schema/mvc"
    xsi:schemaLocation="http://www.springframework.org/schema/beans
                        http://www.springframework.org/schema/beans/spring-beans-3.0.xsd
                        http://www.springframework.org/schema/context
                        http://www.springframework.org/schema/context/spring-context-3.0.xsd
                        http://www.springframework.org/schema/mvc
                        http://www.springframework.org/schema/mvc/spring-mvc-3.0.xsd">

    <context:property-placeholder location="classpath*:properties/*.properties" />
    <context:component-scan base-package="fully qualified package path" />
       <bean class="org.springframework.web.servlet.view.InternalResourceViewResolver">
              <property name="prefix" value="/WEB-INF/jsp/" />
              <property name="suffix" value=".jsp" />
       </bean>


</beans>
Following are the important points about SampleWeb-servlet.xml file:
<context:property-placeholder...> tag will be use to load property from the specified location.
<context:component-scan...> tag will allow Spring to load all the components from specified package and all its child packages.
The InternalResourceViewResolver will have rules defined to resolve the view names. By above defined rule, a logical view named sample is delegated to a view implementation located at /WEB-INF/jsp/sample.jsp .


0 Comment(s)